Friday, April 9, 2021

Android internal


Android Internals 101: How Android OS Starts You Application


Ayusch Jain
A sensible writer


This article was originally posted here: https://ayusch.com/android-internals-the-android-os-boot-process/

This post is targeted for Software Engineers wanting to dive deep into Android’s Internals and its workings. We’ll take a look at what happens when your Android Phone boots up but specifically what is Zygote in Android and its role in firing up an application.

We’ll see how an Activity is fired up in Android using ActivityManager and who’s responsible for initializing that Activity Manager. What happens in the init.rc file which starts various daemons in Android. And more such interesting questions.

A knowledge of Android Internals is necessary if you want to build a career as an Android Engineer. Knowledge of Android internals will make you aware of all the optimisations that can be used in your regular development tasks. You’ll be more cautious while allocating objects and creating new activities. Apart from that, it’ll also help you in interviews!

Let’s get started.

Prerequisites

There are some prerequisites to this article. You must be familiar with concepts such as:

Extras:

How Android Boots up?

Here’s the cycle of the bootup process in Android:

This is how it goes: Boot ROM -> Bootloader -> Kernel -> Init -> Dalvik VM -> Zygote -> System Server -> Managers.

Boot ROM

Boot ROM contains the initial code that’s run as soon as the device wakes up. It is a mask ROM or write protected flash drive. Embedded in the CPU chip, Boot ROM loads the Bootloader into RAM for execution.

Here are some examples of Bootrom I found on StackOverflow:

  • iPhone boot ROM. Embedded in the mask ROM and can’t be modified. Loads the next stage boot loader from flash or USB (in DFU mode) and verifies its signature using built-in RSA implementation. Also provides accelerated decryption functions for the next stage bootloader.
  • TI’s OMAP4 boot ROM. Can load user code from flash (NOR, NAND, OneNAND), external memory, SD/MMC, USB or UART. Boot order and options are set by strap (SYSBOOT) pins. Provides some functionality for later stages (cache/TLB management etc.)
  • NXP’s LPCxxxx series Boot ROM. Placed in a hidden portion of the internal flash which is mapped at 0 on power-on. Implements CRP (code read protection), ISP (In-System Programming) which allows to upload and flash new code over UART. If a valid user code is in flash (needs to have proper checksum), maps it to 0 and jumps to it. A part of bootrom remains mapped to provide IAP (In-Application Programming) and some other services.

Source: StackOverflow

Bootloader

Bootloader is a piece of code that runs before any operating system. It is responsible for loading an operating system from the device, setting up a minimal environment in which OS can run and beginning the startup process. Hence, bootloader is not specific to Android.

In the context of Android (pun intended!) you might’ve heard of OEM manufacturers placing certain limitations on the operating system (eg: limited background processes). This is where those rules are stored.

One of the major tasks of bootloader involves setting up memory management, security options. This is essential for the Kernel.Bootloader contains two important files: init.s and main.c

Init.s is responsible for initializing stacks, and BSS segments. It eventually calls main.c which is responsible for initializing hardware such as keyboard, system clock, console etc.

Most importantly, the bootloader verifies the integrity of the boot and recovery partitions before moving execution to the kernel and displays the warnings specified in the section Boot state.

Kernel

Once kernel boots up, it starts setup cache, loads drivers, mounts file system, starts kernel daemons etc. Once it finishes system setup, it looks for init process in the system files and launch the root/first process.

Without Kernel, your software won’t have a chance to communicate with the hardware.

Init

This is a very crucial process. It is where the directories such as /dev, /sys, /proc are mounted. This is also the place where init.rc script is executed.

Init process also starts the daemons such as bluetooth daemon, adb daemon etc. These handle low level hardware interface including radio interface.

If you take a look at init.rc script you’ll find that it includes commands such as “start vold” for file system, “trigger zygote” for starting the Zygote process in Android.

One of the most important things that happens during this init process is a call to start the Zygote. The app_process command starts the ART or Dalvik VM and also give a call to Zygote’s main() method.

Zygote and VM

When the command app_process launches the Zygote, first a VM instance is created and then a call to Zygote’s main() function happens.

According to dictionary definition: Zygote is the first cell that’s formed during fertilisation. Similarly, Zygote is the first Android specific process when Android OS boots up!”

Zygote preloads all the system resources and classes used by the Android framework thus achieving fast app launches.

The Zygote forks itself to start a “system-server”. The system-server starts services such as ActivityManagerService, Hardware services etc.

It starts listening on a socket interface for future requests to spawn off new virtual machines (VM) for managing new application processes. On receiving a new request, it forks itself to create a new process which gets a pre-initialized VM instance.

This forking is available due to copy-on-write resource management technique. It doesn’t copy anything actually, just points to the pages of the parent process. The actual copying happens when there is a new write to the process’ pages.

The forking happens very efficiently. A new Dalvik VM is created, process gets its own thread and resources to work with. This enables code sharing among VMs thus resulting in minimal startup time.

System Server

System Server is the first service started by the Zygote. The first thing system server does is starts the native library called android_servers that provides interfaces to native functionalities.

It starts initializing each system service and and registering them with the previously started Service Manager. Each service runs in a separate Dalvik thread in system server.

ActivityManager is responsible for starting the Launcher App and registering click listeners to it. It also manages the activity lifecycle, maintains activity stack etc.

System Server also starts other services beginning with com.android such as com.android.phone, com.android.email. It also starts other managers such as Location Manager, Bluetooth Manager etc.

Activity Manager

It is responsible for activity thread process creation, activity stack management and activity lifecycle management. At the end, it launches an intent to start Home Launcher and registers on click listeners to it. Whenever a click is detected, it launches new apps from icons on home screen.

The click events are transferred to AcitivityManagerService via Binder IPC. AMS performs multiple steps:

  • Collect info about the target intent of intent object. It does so using resolveIntent() method.
  • Information about target is saved back into the intent object.
  • Now, it’s checked if the user can actually access the target using grantUriPermissionLocked() method.
  • Then AMS checks if the intent needs to be opened as a new task. It check for flags such as FLAG_ACTIVITY_NEW_TASK etc.
  • If the process doesn’t already exist for the target, the AMS has to create a new process for this.

Conclusion

This article will help you host CloudAnchors using Google Cloud Anchors API. Let me know if you’ll face any problems and I’ll be happy to help :)


Tags: Android, Android App Development, Mobile App Development, AndroidDev, Operating Systems


Thursday, April 8, 2021

Understanding Android Core: Looper, Handler, and HandlerThread


Understanding Android Core: Looper, Handler, and HandlerThread

Understanding Android Core: Looper, Handler, and HandlerThread

This Article covers Android Looper, Handler, and HandlerThread. These are among the building blocks of Android OS.

In my own experience, I have used them in a very limited context until recently. My use case involved sending tasks to the main/ui thread, primarily to update the UI from any other thread. The other aspects of the multi-threaded operation were handled through alternate ways like ThreadPoolExecutor, IntentService, and AsyncTask.

MultiThreading and task running are old subjects. Java itself has java.util.concurrent package and Fork/Join framework to facilitate it. Several libraries have been written to streamline asynchronous operations. RxJava is the most popular library today for reactive programming and designing an asynchronous application.

So, why am I writing about the old school?

LooperHandler, and HandlerThread are the Android’s way of solving the problems of asynchronous programming. They are not old school, but a neat structure on which a complex android framework is built.

For new developers, it’s highly recommended to understand the principles behind them and experienced one’s should revisit this topic to recollect the minor details.

I have also created a video tutorial for this subject, and I highly recommend to watch it. Click here to watch now.

Use Cases:

  1. The main thread in Android is built with a Looper and Handlers. So, the understanding of it is essential to create an unblocked responsive UI.
  2. The developers writing libraries cannot afford to use third party libraries because of the library size. So, for them, the best option is to utilize the existing available resource. Writing own solution for it may not always get that level of efficiency and optimization.
  3. The same argument can also be made for companies/individuals shipping out SDKs. The clients can have varied implementations, but all of them will share the common android framework APIs.
  4. Understanding them fully will enhance the capacity to follow the Android SDK and package classes in general.
Thumbnail Image

30% DISCOUNT NOW

Android Online Course for Professionals by MindOrks

Join and learn Dagger, Kotlin, RxJava, MVVM, Architecture Components, Coroutines, Unit Testing and much more.

Let’s start the exploration/revision with a questionnaire.

I expect the reader to have the basic understanding of java threads. If you need, then get a quick overview of java Thread and Runnable.

What is the problem with java thread?

Java threads are one-time use only and die after executing its run method.

Can we improve upon it?

The Thread is a double edged sword. We can speed up the execution by distributing the tasks among threads of execution, but can also slow it down when threads are in excess. Thread creation in itself is an overhead. So, the best option is to have an optimum number of threads and reuse them for tasks execution.

Model for thread reusability:

  1. The thread is kept alive, in a loop via it’s run() method.
  2. The task is executed serially by that thread and is maintained in a queue (MessageQueue).
  3. The thread must be terminated when done.

What is the Android’s way of doing it?

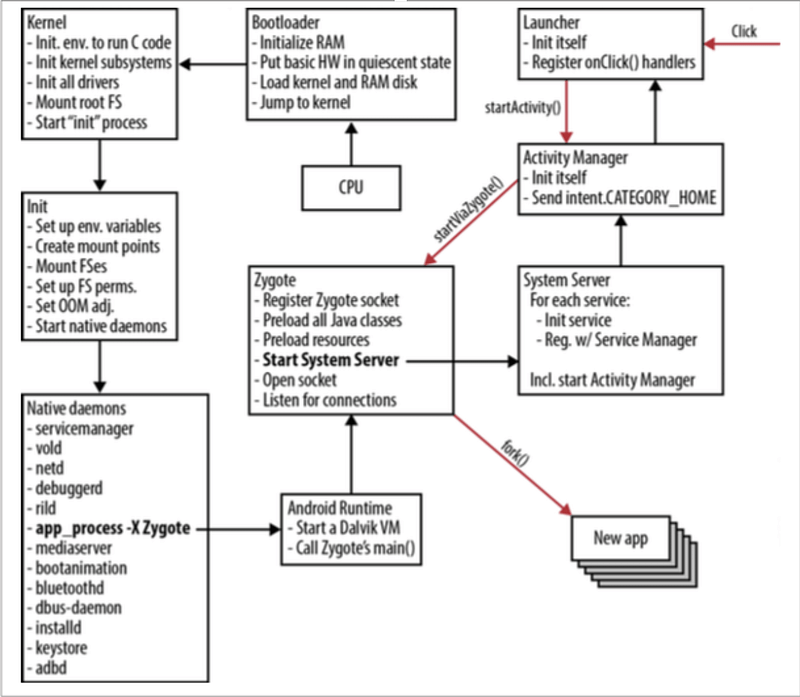
The above model is implemented in the Android via LooperHandler, and HandlerThread. The System can be visualized to be a vehicle as in the article’s cover.

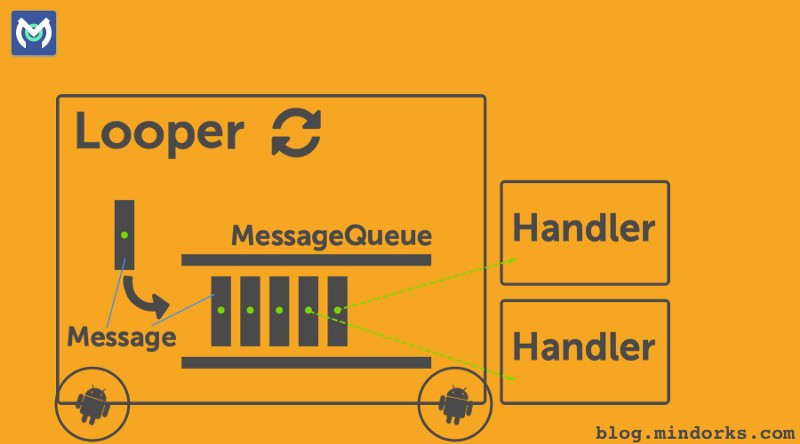
  1. MessageQueue is a queue that has tasks called messages which should be processed.
  2. Handler enqueues task in the MessageQueue using Looper and also executes them when the task comes out of the MessageQueue.
  3. Looper is a worker that keeps a thread alive, loops through MessageQueueand sends messages to the corresponding handler to process.
  4. Finally Thread gets terminated by calling Looper’s quit() method.
One thread can have only one unique Looper and can have many unique Handlers associated with it.

Creating Looper and MessageQueue for a Thread:

A thread gets a Looper and MessageQueue by calling Looper.prepare()after its running. Looper.prepare() identifies the calling thread, creates a Looper and MessageQueue object and associate the thread with them in ThreadLocal storage class. Looper.loop()must be called to start the associated looper. Similarly, the looper must be terminated explicitly through looper.quit().

class LooperThread extends Thread {
      public Handler mHandler; 

      public void run() { 
          Looper.prepare();

          mHandler = new Handler() { 
              public void handleMessage(Message msg) { 
                 // process incoming messages here
                 // this will run in non-ui/background thread
              } 
          }; 

          Looper.loop();
      } 
  }

Creating Handler for a Thread:

Handler gets implicitly associated with the thread that instantiates it via thread’s Looper, but we can explicitly tie it to a thread by passing the thread’s looper in the constructor of the Handler.

handler = new Handler() {
@Override
public void handleMessage(Message msg) {
        // process incoming messages here
        // this will run in the thread, which instantiates it
    }
};

Sending messages to the MessageQueue via Handler can be done by two modes:

  1. Message: It is a class that defines various useful methods to deal with message data. To send an object we set the obj variable.
Message msg = new Message();
msg.obj = "Ali send message";
handler.sendMessage(msg);

Detailed overview of Message class can be found here:https://developer.android.com/reference/android/os/Message.html

2. Runnable: A runnable can also be posted in the MessageQueue. Ex: posting and running a task in the main thread.

new Handler(Looper.getMainLooper()).post(new Runnable() {
@Override
public void run() {
        // this will run in the main thread
    }
});

In the above example, we create a Handler and provide Looper associated with the main thread. This associate this handler to the main thread. When we post the Runnable, it gets queued in the main thread’s MessageQueue and then executed in the main thread.

Handler is capable of message manipulation in a wide variety of ways, which can found here: https://developer.android.com/reference/android/os/Handler.html

Creating an own thread and providing Lopper and MessageQueue is not the right way to deal with the problem. So, Android has provided HandlerThread(subclass of Thread) to streamline the process. Internally it does the same things that we have done but in a robust way. So, always use HandlerThread.

One of the ways to create the HandlerThread is to subclass it and most of the time you will be using this method.

private class MyHandlerThread extends HandlerThread {

    Handler handler;

    public MyHandlerThread(String name) {
        super(name);
    }

    @Override
    protected void onLooperPrepared() {
        handler = new Handler(getLooper()) {
            @Override
            public void handleMessage(Message msg) {
                // process incoming messages here
                // this will run in non-ui/background thread
            }
        };
    }
}

Note: We have instantiated the Handler when the onLooperPrepared() is called. So, that Handler can be associated with that Looper.

  1. Looper is only prepared after HandlerThread’s start() is called i.e. after the thread is running.
  2. Handler can be associated with a HandlerThread, only after it’s Looper is prepared.

Other way to create the HandlerThread:

HandlerThread handlerThread = new HandlerThread("MyHandlerThread");
handlerThread.start();
Handler handler = new Handler(handlerThread.getLooper());

Note: HandlerThread needs to call myHandlerThread.quit() to free the resources and stop the execution of the thread.

I would suggest practicing the above codes, so you can grasp their little details.

I have created an example project for Post Office simulation. Post Office is built upon HandlerThread and Clients communicate with the help of the Post Office. A Simulator class creates few Client Bots and delegate their communication to the MainActivity, which renders it in a live feed.

The link to this Example

I have also created a video tutorial for this subject, and I highly recommend to watch it. Click here to watch now.

Inapp update

  Inapp update https://desk.zoho.com/portal/vegabirdtech/en/kb/articles/how-to-use-burp-suite-with-android-mobile