https://desk.zoho.com/portal/vegabirdtech/en/kb/articles/how-to-use-burp-suite-with-android-mobile
javaNandroid
Wednesday, October 20, 2021
Friday, October 15, 2021
Thursday, July 29, 2021
anaconda python install
https://www.digitalocean.com/community/tutorials/how-to-install-the-anaconda-python-distribution-on-ubuntu-16-04
Friday, April 9, 2021
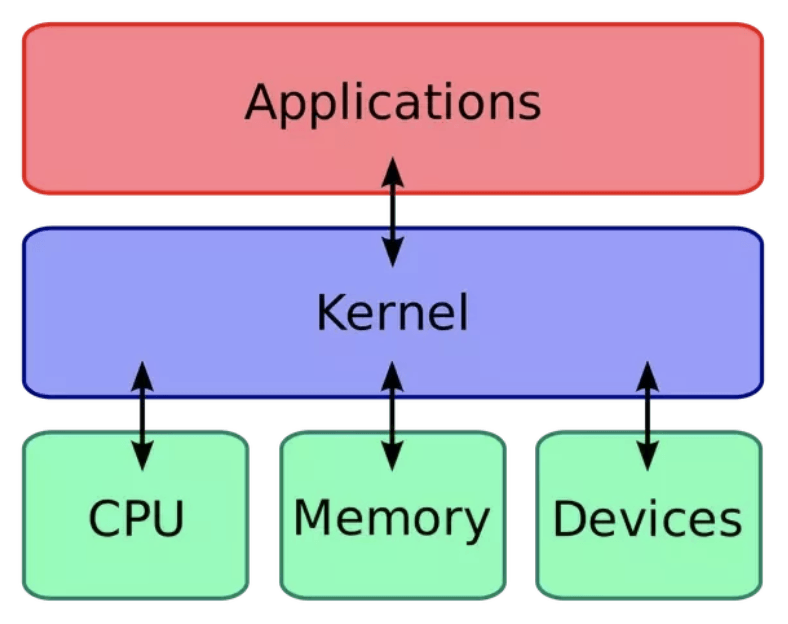
Android internal
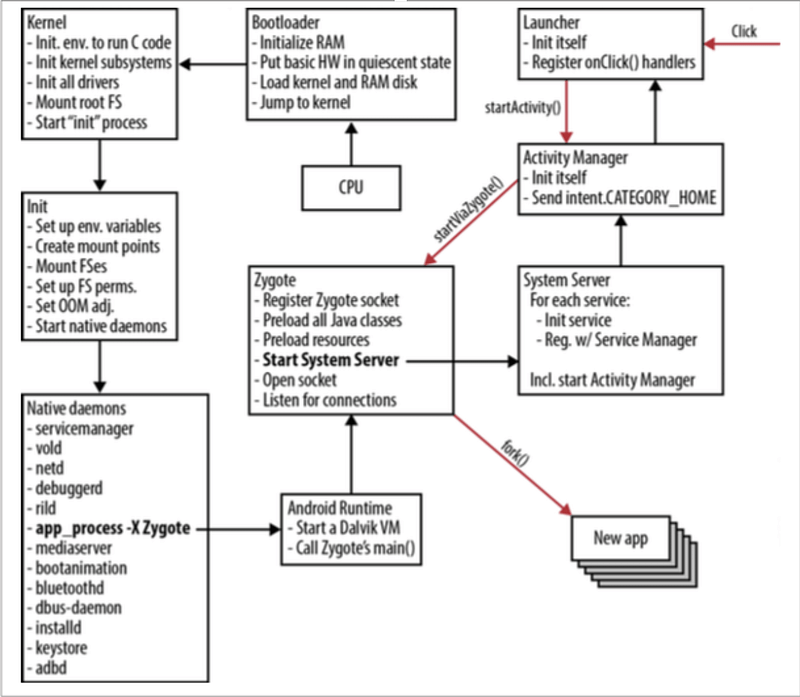
Android Internals 101: How Android OS Starts You Application
| ||||||||
Thursday, April 8, 2021
Understanding Android Core: Looper, Handler, and HandlerThread
Understanding Android Core: Looper, Handler, and HandlerThread

This Article covers Android Looper, Handler, and HandlerThread. These are among the building blocks of Android OS.
In my own experience, I have used them in a very limited context until recently. My use case involved sending tasks to the main/ui thread, primarily to update the UI from any other thread. The other aspects of the multi-threaded operation were handled through alternate ways like ThreadPoolExecutor, IntentService, and AsyncTask.
MultiThreading and task running are old subjects. Java itself has java.util.concurrent package and Fork/Join framework to facilitate it. Several libraries have been written to streamline asynchronous operations. RxJava is the most popular library today for reactive programming and designing an asynchronous application.
So, why am I writing about the old school?
Looper, Handler, and HandlerThread are the Android’s way of solving the problems of asynchronous programming. They are not old school, but a neat structure on which a complex android framework is built.
For new developers, it’s highly recommended to understand the principles behind them and experienced one’s should revisit this topic to recollect the minor details.
I have also created a video tutorial for this subject, and I highly recommend to watch it. Click here to watch now.
Use Cases:
- The main thread in Android is built with a
LooperandHandlers. So, the understanding of it is essential to create an unblocked responsive UI. - The developers writing libraries cannot afford to use third party libraries because of the library size. So, for them, the best option is to utilize the existing available resource. Writing own solution for it may not always get that level of efficiency and optimization.
- The same argument can also be made for companies/individuals shipping out SDKs. The clients can have varied implementations, but all of them will share the common android framework APIs.
- Understanding them fully will enhance the capacity to follow the Android SDK and package classes in general.

30% DISCOUNT NOW
Android Online Course for Professionals by MindOrks
Join and learn Dagger, Kotlin, RxJava, MVVM, Architecture Components, Coroutines, Unit Testing and much more.
Let’s start the exploration/revision with a questionnaire.
I expect the reader to have the basic understanding of java threads. If you need, then get a quick overview of java Thread and Runnable.
What is the problem with java thread?
Java threads are one-time use only and die after executing its run method.
Can we improve upon it?
The Thread is a double edged sword. We can speed up the execution by distributing the tasks among threads of execution, but can also slow it down when threads are in excess. Thread creation in itself is an overhead. So, the best option is to have an optimum number of threads and reuse them for tasks execution.
Model for thread reusability:
- The thread is kept alive, in a loop via it’s
run()method. - The task is executed serially by that thread and is maintained in a queue (MessageQueue).
- The thread must be terminated when done.
What is the Android’s way of doing it?
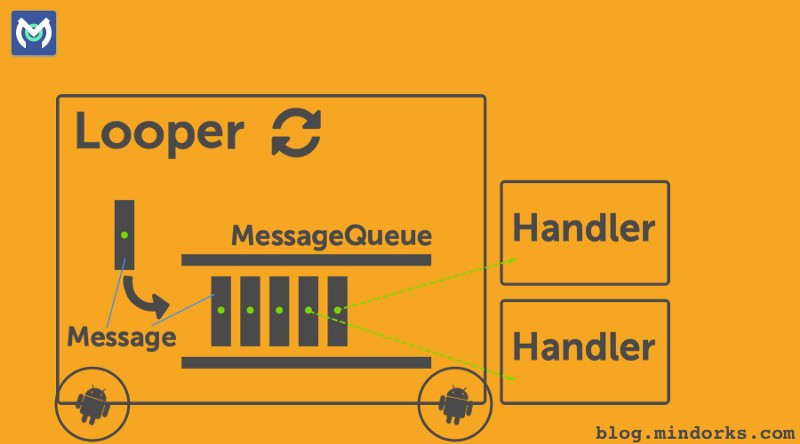
The above model is implemented in the Android via Looper, Handler, and HandlerThread. The System can be visualized to be a vehicle as in the article’s cover.
MessageQueueis a queue that has tasks called messages which should be processed.Handlerenqueues task in theMessageQueueusingLooperand also executes them when the task comes out of theMessageQueue.Looperis a worker that keeps a thread alive, loops throughMessageQueueand sends messages to the correspondinghandlerto process.- Finally
Threadgets terminated by calling Looper’squit()method.
One thread can have only one unique Looper and can have many unique Handlers associated with it.
Creating Looper and MessageQueue for a Thread:
A thread gets a Looper and MessageQueue by calling Looper.prepare()after its running. Looper.prepare() identifies the calling thread, creates a Looper and MessageQueue object and associate the thread with them in ThreadLocal storage class. Looper.loop()must be called to start the associated looper. Similarly, the looper must be terminated explicitly through looper.quit().
class LooperThread extends Thread {
      public Handler mHandler;

      public void run() {
          Looper.prepare();

          mHandler = new Handler() {
              public void handleMessage(Message msg) {
                 // process incoming messages here
                 // this will run in non-ui/background thread
              }
          };

          Looper.loop();
      }
  }
Creating Handler for a Thread:
A Handler gets implicitly associated with the thread that instantiates it via thread’s Looper, but we can explicitly tie it to a thread by passing the thread’s looper in the constructor of the Handler.
handler = new Handler() {
@Override
public void handleMessage(Message msg) {
        // process incoming messages here
        // this will run in the thread, which instantiates it
    }
};
Sending messages to the MessageQueue via Handler can be done by two modes:
Message: It is a class that defines various useful methods to deal with message data. To send an object we set the obj variable.
Message msg = new Message();
msg.obj = "Ali send message";
handler.sendMessage(msg);
Detailed overview of Message class can be found here:https://developer.android.com/reference/android/os/Message.html
2. Runnable: A runnable can also be posted in the MessageQueue. Ex: posting and running a task in the main thread.
new Handler(Looper.getMainLooper()).post(new Runnable() {
@Override
public void run() {
        // this will run in the main thread
    }
});
In the above example, we create a Handler and provide Looper associated with the main thread. This associate this handler to the main thread. When we post the Runnable, it gets queued in the main thread’s MessageQueue and then executed in the main thread.
Handler is capable of message manipulation in a wide variety of ways, which can found here: https://developer.android.com/reference/android/os/Handler.html
Creating an own thread and providing Lopper and MessageQueue is not the right way to deal with the problem. So, Android has provided HandlerThread(subclass of Thread) to streamline the process. Internally it does the same things that we have done but in a robust way. So, always use HandlerThread.
One of the ways to create the HandlerThread is to subclass it and most of the time you will be using this method.
private class MyHandlerThread extends HandlerThread {

    Handler handler;

    public MyHandlerThread(String name) {
        super(name);
    }

    @Override
    protected void onLooperPrepared() {
        handler = new Handler(getLooper()) {
            @Override
            public void handleMessage(Message msg) {
                // process incoming messages here
                // this will run in non-ui/background thread
            }
        };
    }
}
Note: We have instantiated the Handler when the onLooperPrepared() is called. So, that Handler can be associated with that Looper.
Looperis only prepared after HandlerThread’sstart()is called i.e. after the thread is running.- A
Handlercan be associated with aHandlerThread, only after it’sLooperis prepared.
Other way to create the HandlerThread:
HandlerThread handlerThread = new HandlerThread("MyHandlerThread");
handlerThread.start();
Handler handler = new Handler(handlerThread.getLooper());
Note: HandlerThread needs to call myHandlerThread.quit() to free the resources and stop the execution of the thread.
I would suggest practicing the above codes, so you can grasp their little details.
I have created an example project for Post Office simulation. Post Office is built upon HandlerThread and Clients communicate with the help of the Post Office. A Simulator class creates few Client Bots and delegate their communication to the MainActivity, which renders it in a live feed.
I have also created a video tutorial for this subject, and I highly recommend to watch it. Click here to watch now.
Sunday, March 28, 2021
SparceBooleanArrays
SparseBooleanArrays map integers to booleans which basically means that it's like a map with Integer as a key and a boolean as value (Map).
However it's more efficient to use in this particular case It is intended to be more efficient than using a HashMap to map Integers to Booleans
Java NIO FileChannel
A Java NIO FileChannel is a channel that is connected to a file. Using a file channel you can read data from a file, and write data to a file. The Java NIO FileChannel class is NIO's an alternative to reading files with the standard Java IO API.
A FileChannel cannot be set into non-blocking mode. It always runs in blocking mode.
Opening a FileChannel
Before you can use a FileChannel you must open it. You cannot open a FileChannel directly. You need to obtain a FileChannel via an InputStream, OutputStream, or a RandomAccessFile. Here is how you open a FileChannel via a RandomAccessFile:
RandomAccessFile aFile     = new RandomAccessFile("data/nio-data.txt", "rw");
FileChannel      inChannel = aFile.getChannel();
Reading Data from a FileChannel
To read data from a FileChannel you call one of the read() methods. Here is an example:
ByteBuffer buf = ByteBuffer.allocate(48);

int bytesRead = inChannel.read(buf);
First a Buffer is allocated. The data read from the FileChannel is read into the Buffer.
Second the FileChannel.read() method is called. This method reads data from the FileChannel into the Buffer. The int returned by the read() method tells how many bytes were written into the Buffer. If -1 is returned, the end-of-file is reached.
Writing Data to a FileChannel
Writing data to a FileChannel is done using the FileChannel.write() method, which takes a Buffer as parameter. Here is an example:
String newData = "New String to write to file..." + System.currentTimeMillis();

ByteBuffer buf = ByteBuffer.allocate(48);
buf.clear();
buf.put(newData.getBytes());

buf.flip();

while(buf.hasRemaining()) {
    channel.write(buf);
}
Notice how the FileChannel.write() method is called inside a while-loop. There is no guarantee of how many bytes the write() method writes to the FileChannel. Therefore we repeat the write() call until the Buffer has no further bytes to write.
Closing a FileChannel
When you are done using a FileChannel you must close it. Here is how that is done:
channel.close();
FileChannel Position
When reading or writing to a FileChannel you do so at a specific position. You can obtain the current position of the FileChannel object by calling the position() method.
You can also set the position of the FileChannel by calling the position(long pos) method.
Here are two examples:
long pos channel.position();

channel.position(pos +123);
If you set the position after the end of the file, and try to read from the channel, you will get -1 - the end-of-file marker.
If you set the position after the end of the file, and write to the channel, the file will be expanded to fit the position and written data. This may result in a "file hole", where the physical file on the disk has gaps in the written data.
FileChannel Size
The size() method of the FileChannel object returns the file size of the file the channel is connected to. Here is a simple example:
long fileSize = channel.size();
FileChannel Truncate
You can truncate a file by calling the FileChannel.truncate() method. When you truncate a file, you cut it off at a given length. Here is an example:
channel.truncate(1024);
This example truncates the file at 1024 bytes in length.
FileChannel Force
The FileChannel.force() method flushes all unwritten data from the channel to the disk. An operating system may cache data in memory for performance reasons, so you are not guaranteed that data written to the channel is actually written to disk, until you call the force() method.
The force() method takes a boolean as parameter, telling whether the file meta data (permission etc.) should be flushed too.
Here is an example which flushes both data and meta data:
channel.force(true);
Inapp update
Inapp update https://desk.zoho.com/portal/vegabirdtech/en/kb/articles/how-to-use-burp-suite-with-android-mobile
-
Understanding Android Core: Looper, Handler, and HandlerThread This Article covers Android Looper, Handler, and HandlerThread. These are a...
-
Android Option Menu Example Android Option Menus are the primary menus of android. They can be used for settings, search, delete item etc...
-
Android Custom ListView (Adding Images, sub-title) After creating simple ListView, android also provides facilities to customize our ListV...


